Showing posts with label Recipes. Show all posts

Sunday, February 3, 2013

Pinterest caramel

So we all know I'm obsessed with Pinterest, I'm a full blown addict and I've been trying fun recipes and crafts off of there, so here's a new one I decided to try. It's for crockpot caramel, this is something I pride myself on making from scratch every year, but I decided once to try the "easy" way out. It wasn't too bad surprisingly, and came out better than I expected. While it wasn't as good as my salted caramel sauce, it was good to use in a recipe. I ended up layering it into caramel butter bars, recipe to follow as well.
The crockpot caramel was easy to make and anyone with a crockpot can make it. All you have to do is buy some sweetened condensed milk in cans and rip off the labels. Then out them in the crockpot and fill it up with water covering the cans. I also recommend you use a crock pot liner, I had never used one before, but it kept the inside of my crockpot clean and didn't damage it from the junk on the cans.
Then you leave it in the crockpot on low for 8 hours. Once the cooking time is done take them out of the crockpot to cool. After the cans are cooled a bit put them in the fridge to get cold. Since I live in upstate new York where it's freezing in the winter I just brought my cans straight out to the garage to cool and skipped the whole cooling down and putting in the fridge process. I guess there are some benefits to the below zero degree weather we've had lately.
I opened it up and it was pretty good, I found it worked very well in recipes though I didn't like it as much just plain. A least it wasn't too bad, I got to out it on my blog instead of the pinterest fail blog!


Sunday, January 27, 2013

Who wants some squid and snails?

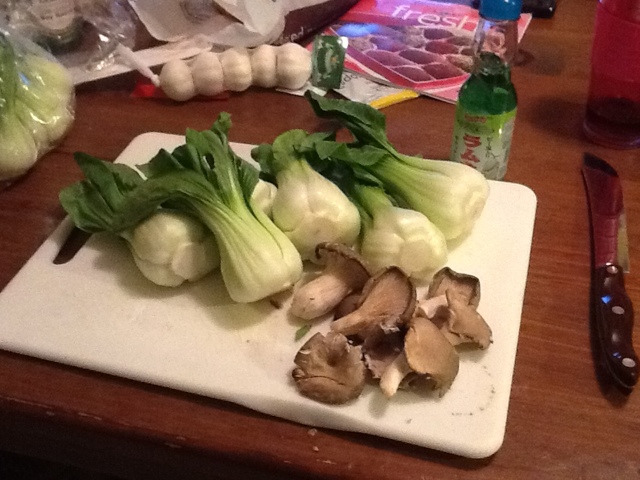
On the upside my lack of sleeping ability is great for my blogging. When I went to the Asian market I picked up some interesting things for dinner. I got bok choy and garlic to make my favorite recipe and this time I actually added in some of those amazing oyster mushrooms that I bought. (looking for my bok choy recipe? Click on the recipes tag at the end of this post and look back a few posts, it's super yummy) Essentially you slice up the bok choy, garlic, and mushrooms, then sauté them in olive oil and soy sauce.
Then I took the cleaned squid (yum!) and sliced the tops (not sure what they're called lol) into strips, then made sure to remove the eyeballs since they gave me the heebes and just chopped off the tentacles (can't skip out the on the tentacles).
Then I tossed the squid and snail meat (remember the snail meat I bought?) into a hot wok with some soy sauce and mix them around. If you cut thin strips like I did you only want to have them in the pan for about 3 minutes or they will get rubbery and chewy. Also snail meat is pretty rubbery to begin with so you don't want to over cook it, otherwise it will taste like you're munching on rubber.
Then I put the squid and snails over some nice jasmine rice and plated it with the mushrooms and bok choy. I separated them on my place for easier photos, but you can mix them together not he plate if you choose. The other reason I chose not to cook them together is because I made extra bok choy and mushrooms to use for dumpling filling a night or two later and wanted to use a different meat in them.


Sunday, January 20, 2013

Eggnog cheesecake

For Christmas this year I made eggnog cheesecake! It was one of my best cheesecakes ever, and even people who don't really like straight up eggnog (even I only like it in small doses) ate it like nobodies business. Since this is one of my made up recipes, but it's a variation on my regular cheesecake, I'll share my recipe here! As I've said before one of the secrets to my cheesecake is mixing all my ingredients in a food processor to make it extra smooth. For this cheesecake I used a gram cracker crust (normally I prefer vanilla wafers) I just grind them up in the food processor and mix it with some melted butter before spreading it out in a greased springform pan. Then I toast the crust in the ovens for about 10 minutes at 400 to get it golden brown.
So here is the eggnog cheesecake recipe, it was super yummy and a bit addicting. Just combine all of the following ingredients into your food processor and blend. 3 bricks of cream cheese, 2 eggs, 2 cups of eggnog, 1 tablespoon of vanilla extract, and a generous pinch of nutmeg. I did the nutmeg to taste so to speak and it was probably two good size pinches since this will make a large 10" cheesecake. I also don't water bath my cheesecake, I just cook the, in the oven at 425 for 25 minutes and then turn the oven off. Don't take the cheesecake out, don't open the oven, just leave it in there for 45 minutes. At that point you should be able to pick it and have the pick come out clean and as long as you don't move it I don't tend to have cracks.
Sorry I don't have a better photo of the cheesecake, it got eaten and devoured and then divided up for people to take home. I was told it tasted just like eggnog and better in some cases because it was appreciated by people who don't even normally like eggnog.
I hope you enjoyed, this is as close as you will ever get to my cheesecake recipe, because that's one I plan to save until I have my own kids to pass it on to, I won't even tell my mother or family members exactly how I make it!


Thursday, January 17, 2013

Roasted artichoke hearts

Part of my trader joes shopping trip was picking up a bag of frozen artichoke hearts. They're a great healthy vegetable that doesn't need to be saved just for dips! I let them thaw and laid them out on a foil lined cookie sheet and drizzled them with olive oil. Then I sprinkled them with some sea salt and some minced garlic. I roasted them in the oven at 400 degrees for about 25 minutes or until brown and toasty, not too crispy. They made a great side dish and were very healthy!
I also made a London broil steak and sliced some zucchini on the mandoline at 1/8 thickness and sautéed them in a pan with a very small amount of olive oil and some soy sauce. All in all it was a great meal.


Wednesday, January 16, 2013

Smokey roasted potatoes

One of the cool things I picked up while at trader joes was a couple bags of "trader joes tiny potatoes" essentially they are yummy little fingerling potatoes. I always love working with fingerling potatoes because you can roast them whole pretty quickly and they're like little bite sized bits of happiness. They're also great because you can roast them whole with the skins on maintaining most of the nutrients.
I decided I wanted to do something a little different than my usual roasted potatoes with rosemary and thyme so I looked through my spice cabinet. I decided to make some smokey fingerling potatoes!

Ingredients
2 lbs fingerling (or trader joes tiny potatoes)
Some liquid smoke
Coarse sea salt
Powdered Garlic

Step 1: preheat oven to 400 degrees and wash the potatoes, make sure you clean the first off since you won't be pealing them.
Step 2: put all your potatoes in a bowl and drizzle with olive oil and about 5-6 shakes of liquid smoke. Then take a spoon and mix them up in the bowl so that each potato is coated evenly.
Sep 3: sprinkle with a three pinches of sea salt (potatoes are one of those veggies that eat sea salt like nobody's business and you need to use a little more than you think you normally would. Then sprinkle with garlic powder and mix again making sure they are evenly coated. Feel free to add extra sea salt and garlic to make sure the potatoes are fully covered as you stir.
Step 4: at this point they should begin to smell great and you haven't even put them in the oven yet! Cover a cookie sheet with aluminum foil and then spread the potatoes out on the pan. Try to make sure they lay flat not piling them on top of each other. You may need two cookie sheets depending on how many potatoes you make.
Step 5: toss the pan in the oven and cook for about 45 minutes. They should get a nice brown and they should be fork tender.

These potatoes were a huge hit, and a bit addicting. Im known in my family fro making the best herb roasted potatoes, but I even had requests for people to bring thee instead. I bed they'll make a great summertime side during picnic or backyard bbqs.


Monday, January 14, 2013

Christmas dinner

Finally getting around to posting about Christmas dinner. I made a giant (12 pound) prime rib roast. My secrets to a great prime rib are first letting the roast sit out for about an hour on the counter to get it close to room temperature. Then season as you would like, I did toasted onion, rosemary, thyme, and fresh roasted garlic. We took a couple of bulbs of elephant garlic and roasted them in the oven a day or two before and I opened them up and smeared them all over the roast. Then I put it in the oven at 400 for 45 minutes to get a nice sear/crust on the outside. After 45 minutes I covered the pan in foil and turned the oven down to 350 and let it cook forever. Nt really forever, it just felt like it, it was roughly about 5 hours, I was temping it throughout the cooking process so I kind of lost track of time.
I made a few sides, some green beans with mushrooms and onions, cornbread stuffing (it's a southern thing), brown sugar carrots, and Pintrest potatoes.
Here is the recipe I used for the carrots, I actually saw it on Martha Stewart's cooking class on PBS! They were great because they were yummy, looked very fancy, and weren't overly sweet, which I was a little worried about.

What you need:
Lots of carrots
Molasses
Brown sugar
Olive oil
Sea salt

That's it, only 5 ingredients. I cut the carrots into sticks, you could also slice them into "coins" if you prefer. Then I put my carrots in a pan and sautéed them with a little bit of olive oil and some sea salt until they are tender, but not mushy. I mixed the brown sugar and molasses together in a separate bowl before tossing it in with the carrots in the pan so it could caramelize into a glaze. I used about 2/3 of a cup brown sugar and 3 tablespoons molasses for 2 pounds on carrots. After the carrots are tender pour the sugar/molasses mixture into the pan with the carrots and mix it to coat the carrots as evenly as possible. Then put them in a dish and serve!


Sunday, January 6, 2013

Christmas appetizer.... With bacon!

Since I served Christmas dinner for everyone here this year I had some appetizers, dips and things to have out before the meal while people are chatting and opening presents. Plus that's usually the time I'm int he kitchen rushing around getting the meal finished so it keeps everyone in the living room and out of my hair.
I saw the lazy guy on the pilsbury commercial make these bacon cheddar pinwheels and decided they would be perfect. Of course since its me I didn't go on the website and look up the recipe I decided to just wing it. So here's what I ended up doing.
First I cooked my bacon on a sheet pan in the oven. I did it this way for a couple different reason, one because I had to make a ton of bacon for multiple components of my meal, and also because it's less messy than the stovetop. To cook the bacon you lay the bacon on on some parchment paper on the cookie sheet and then cover it with bacon. Then put the pans in a cold oven and turn it up to 375 and cook for 20 minutes. The foil keeps it from getting burned and also from getting oil all over your oven.
Then I layer out the crescent roll and add a layer of shredded cheese. I chose a Monterey jack blend rather than just a straight cheddar. Then I add a layer of chopped bacon and roll it up. This is where it got a little tricky because I had to slice them without ripping or smashing them. I found a sharp knife (not serrated) and kind of a sawing motion worked the best. I did slices that were about 1/2 inch thick.
Make sure you grease the pans well and cook at 400 for about 12 minutes or until golden brown and the cheese is melted. They were easy to make and a big hit.


Rachel's cookies

While Rachel was in the hospital I made her a little care package and dropped it off with the nurses as she wasn't up for visitors. One of the things I put in her basket was a ton of oatmeal cookies I made from scratch. Oatmeal cookies were her favorite kind and I had promised to bake her some at Christmas time. They were nice and soft too. I filled up the cookie jar on Saturday morning when I made the cookies, then left Sunday morning to go to Atlantic city, by the time I came back on Wednesday afternoon they were all long gone. Here is my recipe as well as some photos.
FYI this recipe yields about 48 cookies

Ingredients
2 cups butter (softened)
2 cups white sugar
2 cups brown sugar
4 eggs
2 teaspoons vanilla extract

4 cups all purpose flour
2 teaspoons baking soda
2 teaspoons salt
1 tablespoon cinnamon
6 cups quick cook oats

Preheat oven to 375 while you're mixing the ingredients. Cream together eggs, butter, both sugars, and vanilla extract in one bowl. In a second bowl mix flour, baking soda, salt, and cinnamon. Combine the contents of both bowls and then mix in the oats.
Depending on the size of your cookies and the type of pans, you will want to bake them for 7-10 minutes. I used basic cookie sheets and found the perfect cooking time was 9 minutes.
They made delicious, soft cookies, that aren't too sweet. You can also add raisins, nuts, or chocolate chips to mix it up a bit. If you're adding any extras like that make sure you fold those into the mix as your last step, either with, or right after the oats.


Wednesday, December 12, 2012

Let's talk about....

Cheesecake! This week I used my meeting group at the local chamber of commerce as guinea pigs for a brownie bottom cheesecake I've been wanting to try. I did not get any complaints, of course I am my own worst critic, but I think with some slight tweaking in cooking time this has some serious potential.
I poured my salted caramel sauce on top to add some extra flavor too and garnished it with a sprinkle of course sea salt as well. The caramel was a little firmer than I would have liked, so I have to use a hot knife to slice it.
I used box brownie mix (I was on a time budget) don't judge me. I chose Betty Crocker dark chocolate fudge brownies. I mixed up one box and poured it in my springform pan. Since brownies bake a different temp than cheesecake this is where you need to get creative.
I put the brownie layer in the oven at 325 for 25 minutes. Then I pulled it out and poured the cheesecake on top. You have to be careful to pour the cheesecake in layers and spread it out over the pan so you don't dent the brownie layer. I was worried about the cakes swirling, but if you pour the cheesecake slowly they stay separate.
Then I upped the oven to 400 and put the whole thing back in the oven for 25 minutes and then shut off the oven. Don't open the door! Leave it in the oven with the temp off for another 25 minutes. A that point you should be good to go and cool your cheesecake. Then drizzle or coat with a topping, caramel, chocolate sauce... You choose.
Enjoy!


Friday, November 23, 2012

Caramel apple cheesecake

So I won't divulge my cheesecake recipe, though I will tell you my secret to making it super smooth and creamy. I make the filling in my food processor rather than a mixer or trying to blend it by hand. The food processor makes it very smooth and mixes all ingredients perfectly.
I am also sorry to bum you out, but i won't give out my salted caramel recipe. Since i like to give it as gifts for holidays I'm keeping it my secret. It's a hybrid of a few different recipes I found online, there are tons of recipes out there, but I make mine with corn syrup.
I cut up 5 large granny smith apples into a small dice, if I had more time I was planning on slicing them and kind of fanning them around the top. Might do that next time I make it, but I was in a bit of a thanksgiving day time crunch. All these apples made 2 cheesecakes and still had a bit left over.
I cooked the apples on the stove in a pan with a full stick of butter, a sprinkle of cinnamon, and a pinch of sea salt at the finish. I then put a thin layer of my caramel sauce over the top of the cake, then a layer or apples and a drizzle for caramel over the top to finish it.
I always make my cheesecake the night before, and if I'm putting a warm topping on the cake I make sure it is cooled before layering it on so that it doesn't cook the cheesecake further. I also make my crust with vanilla wafers rather than graham crackers, it's just always tasted better to me that way.
The cheesecake got rave reviews, of course I had some criticism myself since I'm my own worst critic, but it still tasted super good when I had it for breakfast this morning!


Test kitchen

So I decided to try and make the bok choy from the farmers market. I've never tried to cook it before, but I figured it would be fun to try something new, plus bok choy was 3 bunches for $2. I can never pass up a good deal!
I made garlic and mushroom bok choy.

3 bunches of bok choy
Lots of mushrooms
About 4 cloves of garlic
Olive oil
Sea salt to taste

Wash and cut up the bok choy, if it's baby bok choy you can toss the leaves whole, I sliced them lengthwise into strips about 4 per leaf on the big ones. Then mince the garlic and cut up the mushrooms. Toss the garlic in a hot pan with some olive oil, then throw in the mushrooms. I let those simmer up a bit then put all the bok choy in the pan. Make sure all the leaves are coated in the oil, then add just a bit of water maybe a 1/2 cup and cover. Let it simmer for a bit stirring occasionally. I let mine go for about 15 minutes, you want it to be tender but not mushy. Sprinkle a bit of sea salt on the top before you serve it.
Serve over pasta or just plain and I had mine with a bit of fish. I bought some wild caught sea trout from shoprite! Enjoy the photos.tt


Sunday, November 18, 2012

Roasted acorn squash

So I am absolutely in love with the new show on PBS Martha Stewart's cooking school. It's and old style cooking show a la Julia child. Not like all those jazzed up shows on the food network, Martha just shows you how to cook classic food with good fresh ingredients.
Plus Martha Stewart is my hero, I've always loved her. She is amazing around the home and also runs a massive business empire, she's an inspiration. I've watched movies, documentaries, read her books, and a subscription to her magazines.
The first episode of the show was all about veggies and one of the ones she made was roasted acorn squash which is always a nice treat in the fall. I doctored Martha's recipe slightly (shhh don't tell her) so enjoy!

Step by step
Cut off the stem of the squash and cut it in half. Rip out all the guts. Slice up your acorn squash, you can use the ridges in the squash to guide your cuts, that makes it super easy.

Spread the slices out on a baking pan and drizzle with olive oil. Then I sprinkled them with sea salt, cinnamon, and a little bit of cumin for spice.

Bake them in the oven at 375 for about 25 minutes or until they are fork tender.

It's a great fall side dish!


Yummy yam chips!

Time to make some sweet potato chips. These are so amazingly easy, healthy and yummy. You only need 3 ingredients and a mandoline for slicing. The mandoline is very important because they need to be sliced really thin, mine actually has 1 click right below the 1/8 presumably 1/16 and that's the setting I use that way that still have that nice crunch. Also don't be afraid of them getting a little burned, they get caramelized and don't taste burned.

Gather up your three ingredients, sweet potatoes, olive oil, and coarse sea salt.

So here's all you need to do....

1. Slice the sweet potatoes very thin, again see above for level guides.
2. Put them all in a big bowl and coat them with olive oil and coarse sea salt and toss them in the bowl. Make sure you coat each of the slices as best you can.

Then bake them at 400 degrees for about 12 minutes each. To keep them crispy on of my tricks is to put metal cooling racks on my cookie sheets. This also keeps them from burning too much. Don't think you have to put in a ton of this either, both my cookie sheets and the cooling racks came from the dollar store, you don't have to spend a ton of money on pans and supplies, just get creative.
Here are some photos to help you through the process too!


Monday, November 5, 2012

Crockpot breakfast

Yum! I loooove using my slow cooker and it's getting to that season where I'll be pulling it out at least one or twice a week. I have a big 7 quart slow cooker and it's one of my favorite appliances.
I wanted a nice easy breakfast in the morning so here it is. I was still in a Mexican mood from Friday night so I made breakfast tacos on Saturday morning too! If you have a smaller crock pot than 7 qts this will work better for you since it cooks faster than normal in a larger pot because the casserole becomes thinner. It was still a easy and popular breakfast and is great as a filler for tacos or breakfast sandwiches as well.
You can swap out the meat for many different things, I used turkey sausage since its much healthier.
Ingredients:
18 eggs
12 oz of mushrooms (sliced)
1/2 an vidalia onion
1lb turkey sausage (chopped)
2 cups frozen spinach (thawed and drained)
1 cup shredded cheese

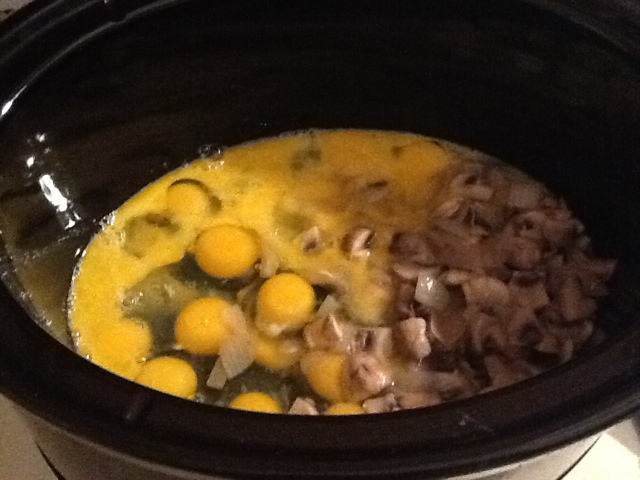
First sauté the onion and mushrooms in a hot pan with a tablespoon of butter. While they're cooking you can start cracking eggs into the slow cooker and scramble them all up. Once the onions and mushrooms are done pour them into the crock pot with the eggs. Then cook up the sausage in the same pan you cooked the onions and mushrooms in to get the extra flavor. Once the sausage is cooked up drain it of any excess grease and toss it in the crock pot along with the spinach. Stir the whole mixture then sprinkle the shredded cheese over the top and turn it on low for 6 hours. The great thing about this recipe is its easy to make more if you need to or less. Again if you have a large slow cooker like me and the casserole is thin make sure you check the time because it will cook faster.

Saturday, November 3, 2012

Crockpot Mexican

We had a friend couch surfing with us and a bunch of plans for the evening so I wanted something easy, quick, and ready when we got home. That's one of the reasons I love my slow cooker.
I did shredded chicken, but you can also do it with pork or beef. It makes a great filler for tacos, burritos, or quesadillas.
You take the meat of your choice (I used boneless chicken breast)
1 bottle of salsa
1 package of taco seasoning

Put it all in the slow cooker for 6-8 hours. Super easy and a yummy filler for all your Mexican dinners. I made quesadillas with mine!

Tuesday, October 30, 2012

Cranberry beans

Finally getting around to posting about dinner from the farmers market the Sunday before last. The only thing not bought there was the meat (I had a roast in the fridge that needed to be cooked) and the mushrooms since I couldn't find any I liked there.
I served sautéed cranberry beans with mushrooms. I cooked them in the wok with some water, some olive oil, and a little coarse sea salt. I chose to pair them with mushrooms to bring out the nutty, earthy flavor in the beans. If I had it to do over again I would probably blanche the beans before I sautéed them to soften them a bit, even after cooking them for almost an hour they were a bit firm.
I rubbed the roast with some salt, rosemary, thyme, toasted onion, and pepper.
The other veg was some nice acorn squash I picked up at the market. This was easy just a quick roast on a cookie sheet in the oven. Cut into 1/2 or 1/4 s your choice, coat with some butter or olive oil and a sprinkle of nutmeg then roasted till browned and tender. I just tossed it in next to the roast which I was cooking at 400.
Then I made a yummy gravy from the roast drippings. I always add a big of cornstarch as a thickener for the gravy. This was some seriously good gravy.

Monday, October 22, 2012

Pintrest potatoes!

The other night I made roast chicken for dinner, yummy as always and these really neat looking roasted potatoes I saw on Pintrest. I'll spare you the details on the chicken since it was basic roast chicken. Let's focus on those super awesome potatoes.
Preheat your oven to 400 degrees. Then wash off your potatoes, I recommend russet or Yukon gold. Then make many cuts into the potato like you are making thin slices, but do not cut all the way through the potato, only cut about 3/4 of the way through the potato. You will need a sharp non serrated knife to make these cuts.
Then fan the potatoes with your fingers lightly just to open them up a bit. Don't tear the potatoes. Then drizzle some olive oil over the potatoes. I used some olive oil infused with truffle oil to bring out the earthiness of the potatoes.
Then sprinkle some corse sea salt over the potatoes. Put them on a baking sheet and roast them in the oven for about 35 minutes or until crispy golden brown. They are great because the oil helps the thin slices stay crispy and get a nice crunch to them, but the bottom is like having a baked potato. They were easy to make though the slicing was a bit labor intensive they were a huge hit and are a pretty impressive looking yet easy to make side dish.

Sunday, October 21, 2012

Potluck Friday!

So Friday we had a potluck lunch at work for the world series. Everyone could wear their favorite baseball gear and brought in something to share (or chipped in money for pizza.) you know I never pass up an opportunity to make food to share!
I made antipasto squares, a recipe I got from one of my old managers which is a godsend for potlucks and a good make ahead appetizer if you're having company because they're easy and you can make them the night before because you serve them cold.
Ingredients:
2 tubes of crescent rolls
1/2 lb of Swiss cheese
1/2 lb baked ham from deli
1/3 lb hard salami from deli
1/3 lb slicing pepperoni from deli
2 eggs

Preheat the oven to 375 and grease a baking pan with just a little bit of Pam or canola oil or whatever you choose. One the first package of crescent rolls and unroll it in the bottom of the pan leaving it in a sheet. If need be stretch the dough so it covers the bottom of the pan completely, but don't worry about the side. Then lay a layer of cheese across the whole thing, a layer of salami, a layer of ham, and a layer of pepperoni. Then one more layer of cheese across the top of the meat layers. Now it's time to open your second package of crescent rolls. This will be your top layer so just make sure it covers the pan. Then scramble up the two eggs in a separate bowl and pour the eggs over the top. Try and spread it evenly over the top crescent layer. The egg will act as a sealant to bind all the layers together. Don't worry if some of the egg pools it will all cook and look nice.
Cover the pan in foil and place in the oven to cook for 15 minutes, then take off the foil and bake for another 15 minutes. Allow to cool and put in the fridge before cutting. It's much easier to cut when it's cold. Cut them into squares and serve right out of the pan or arrange them on a fancy plate.
Sorry the photos are backwards in order from completion through the steps. They were a huge hit at the potluck and I hope ya'll enjoyed the recipe!

Sunday, September 30, 2012

Festiva chicken!

Named for the car of course, now they have the fiesta but I always liked the festiva more. I was at price rite on Thursday night trying to decide what to make for dinner. The only request I had was for chicken the rest was up to me. I've been trying hard to come up with healthy recipes.

Ingredients:
5 limes
2 pkgs of chicken tenders (you can use any kind of chicken, but I wanted
Something boneless and skinless and tenders happened to be a better price than full breasts)
1 garlic bulb
A bunch of fresh cilantro

Mince the garlic and the cilantro and spread about 1/2 of those two ingredients in the bottom of the pan.
I sliced 2 limes, you can leave the rind on or slice it off. I sliced mine off for presentation and ease of eating the lime later. Then cut the other 3 limes in half and juice them.
Layer the chicken in the pan so none of the pieces are overlapping. Then place the rest of the garlic/cilantro mixture over the top of the chicken and pour the lime juice evenly over the whole pan.
Cover the pan with plastic and put in the fridge for about an hour (longer is fine too so if you want to make it in the morning and toss it in the oven when you get home that's fine too) just make sure you uncover the chicken before you put it in the oven!
Cook the dish at 400 for about 40 minutes (cooking time may vary depending on he cut of meat you use)

Enjoy, it's a great healthy recipe with no added salt, but tons of flavor! Serve with rice and veggies.

FYI this meal was not only healthy, but very cheap to make. About $8 worth of chicken, the fresh cilantro was 79 cents for the bunch and the limes were 5 for $1. So this healthy meal only costs about $12, proving you can eat healthy and cheap. Plus we had tons of leftovers and it got rave reviews.