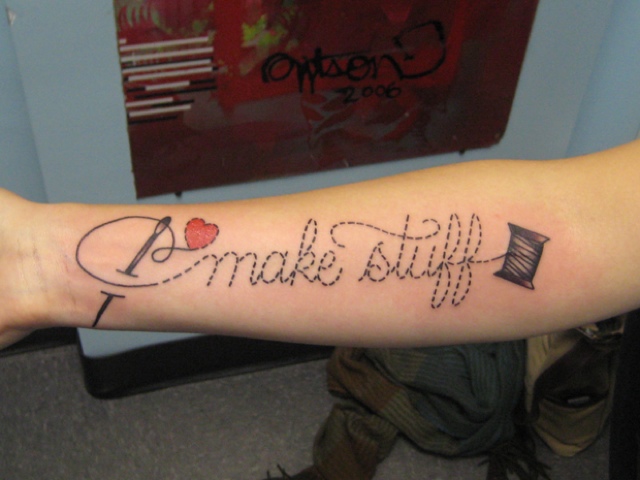
I love crafting and I love tattoos, so here's a great combination. I don't have any crafty ink myself, but I admire these people, some of these are pretty huge.
Showing posts with label Crafting. Show all posts
Friday, February 1, 2013
Sunday, January 27, 2013
Redneck wine glasses
Well since its 6:20 in the morning and I just dropped my father off at work and can't fall back to sleep, I figured I might as well do something more productive than just trolling the Internet for hilarious cat photos. It doesn't help that the cats are all snuggled up next to me and snoring.
But on a positive note, here is my tutorial for redneck wine glasses. I made these as a Christmas present and packaged it with a bottle of torrey ridge winery's redneck red wine. It's a great wine from the finger lakes and one of my favorites actually, they also have a redneck white. It is also only about $12 a bottle so the whole present came in at about $30 including the glue which I have extra of.
I picked up the candle sticks (and could have gotten the mason jars if I didn't have a ton laying around already) at the dollar tree for $1 each. The glue I picked up at lowes and it was $6, I can't vouch for any other brand or type of glue, but I chose the lochite glass glue based in some research. It's rated for glueing glass to glass and is also dishwasher safe. I would still recommend to hand wash the glasses just in case, mostly because I'm paranoid, but the package said you can put them in the dishwasher.
Now on to the tutorial, sorry I don't have better photos, but since you only have a minute or so to get the glueing done I couldn't take many pictures. I will try to describe it as best I can though.
Step one: assemble your supplies, as noted above you don't need many items. Also make sure you have washed and dried the mason jars and candle sticks and removed the price tags because once you glue them they need to sit for 24-48 hours to set so you won't be able to wash them after for a while. Don't forget to make sure the glass is dry before you add the glue or it won't set right.
Step two: Before you put on the glue make sure you put the pieces together just to et the feel for how it will go together. Apply the glue to the top(the side where you insert the candle) of the candle holder. Just around the top rim and don't go crazy with the glue. Also make sure you only apply glue to one of the surfaces, too much glue is not your friend in this craft! Before you use it read the directions on the back of the package on how to apply the glue, trust me it's worth the two minutes of reading. Then attach the candlestick to the bottom of the mason jar keeping it centered on the bottom of the jar. It should be pretty easy to keep it centered. You also have to hold the pieces together for about 60 seconds (again read the package!)
Step three: after that you need to let the glasses set without moving them for 24-48 hours. I let mine sit for 48 hours without moving them again because of my paranoia, but it seemed to work very well. Also let them sit like that upside down so that the candlestick is on the top, that way you don't have to worry about an inquisitive cat wandering around knocking them over..... Or anyone else.
I hope this helps! If you've got questions feel free to ask away in the comments section and I'll do the best to answer with my experience. These were a fun craft to make and as I said including the wine and glue it cost me $30 or less to make the set of 2 glasses. I have seen these glasses sold in stores ranging in price from $15 each to $30 each depending on the store and quality. Yay for crafty Christmas!
But on a positive note, here is my tutorial for redneck wine glasses. I made these as a Christmas present and packaged it with a bottle of torrey ridge winery's redneck red wine. It's a great wine from the finger lakes and one of my favorites actually, they also have a redneck white. It is also only about $12 a bottle so the whole present came in at about $30 including the glue which I have extra of.
I picked up the candle sticks (and could have gotten the mason jars if I didn't have a ton laying around already) at the dollar tree for $1 each. The glue I picked up at lowes and it was $6, I can't vouch for any other brand or type of glue, but I chose the lochite glass glue based in some research. It's rated for glueing glass to glass and is also dishwasher safe. I would still recommend to hand wash the glasses just in case, mostly because I'm paranoid, but the package said you can put them in the dishwasher.
Now on to the tutorial, sorry I don't have better photos, but since you only have a minute or so to get the glueing done I couldn't take many pictures. I will try to describe it as best I can though.
Step one: assemble your supplies, as noted above you don't need many items. Also make sure you have washed and dried the mason jars and candle sticks and removed the price tags because once you glue them they need to sit for 24-48 hours to set so you won't be able to wash them after for a while. Don't forget to make sure the glass is dry before you add the glue or it won't set right.
Step two: Before you put on the glue make sure you put the pieces together just to et the feel for how it will go together. Apply the glue to the top(the side where you insert the candle) of the candle holder. Just around the top rim and don't go crazy with the glue. Also make sure you only apply glue to one of the surfaces, too much glue is not your friend in this craft! Before you use it read the directions on the back of the package on how to apply the glue, trust me it's worth the two minutes of reading. Then attach the candlestick to the bottom of the mason jar keeping it centered on the bottom of the jar. It should be pretty easy to keep it centered. You also have to hold the pieces together for about 60 seconds (again read the package!)
Step three: after that you need to let the glasses set without moving them for 24-48 hours. I let mine sit for 48 hours without moving them again because of my paranoia, but it seemed to work very well. Also let them sit like that upside down so that the candlestick is on the top, that way you don't have to worry about an inquisitive cat wandering around knocking them over..... Or anyone else.
I hope this helps! If you've got questions feel free to ask away in the comments section and I'll do the best to answer with my experience. These were a fun craft to make and as I said including the wine and glue it cost me $30 or less to make the set of 2 glasses. I have seen these glasses sold in stores ranging in price from $15 each to $30 each depending on the store and quality. Yay for crafty Christmas!
Monday, January 14, 2013
Ornament wreath
I finally getting a chance to post this just in time for the holidays to be over and for me to take my wreath off my door at work. I wanted to try and make one of the ornament wreaths that I saw on Pintrest this year, though I'm really not very good with a hot glue gun. I looked at tons of different tutorials and none of them were too good, so in true Maeve fashion I bought the supplies and figured I would wing it.
I tried to take photos step by step to show what I did as well. To save money (we all know I'm cheap) instead of spending $8 on a wreath form at Michael's I went to home depot and bought a long piece of foam pipe insulation from the plumbing department. It only cost me $1.76! I cut it to the size I wanted and attached the two ends with a piece of duct tape. I read where a lot of people used hot glue to attach the ends, but I found the foam melted to quickly and didn't hold very well so I went for the handyman's secret weapon.
Step one: assemble all your items! I used pipe insulation from home depot, a glue gun, tons of ornaments from the dollar store. Trust me you will end up using far more ornaments than you would think. I ended up using ten sleeves of ornaments.
Step two: decide on your wreath size and create a circle from the foam.
Step three: start glueing! I found the best way was to put the glue on the ornament and then press the ornament onto the foam. That way you don't melt the foam as much as putting the glue directly on the foam would. You will have a little bit of melting, but this will keep it from being too bad. There wasn't much rhyme or reason to how I glued them on, and I did it in a couple layers so some of the ornaments are glued on top of other ornaments without touching the foam.
Step four: don't be worried if you have to adjust the size, to make sure my wreath stayed as round as possible. I had to cut about a 1/2 inch of foam, that's why my duct tape has masking tape over it, I misplaced the duct tape.
Step five: hang the wreath and stand back to admire your work! You can put some wire through the foam, but I was able to hang it on my hanger without any extra wire.
Good luck, it's not for the faint of heart and it took me about 4 hours to complete, but I got tons of compliments when I put it on my office door. Everyone was very impressed when I admitted I made it myself.
I tried to take photos step by step to show what I did as well. To save money (we all know I'm cheap) instead of spending $8 on a wreath form at Michael's I went to home depot and bought a long piece of foam pipe insulation from the plumbing department. It only cost me $1.76! I cut it to the size I wanted and attached the two ends with a piece of duct tape. I read where a lot of people used hot glue to attach the ends, but I found the foam melted to quickly and didn't hold very well so I went for the handyman's secret weapon.
Step one: assemble all your items! I used pipe insulation from home depot, a glue gun, tons of ornaments from the dollar store. Trust me you will end up using far more ornaments than you would think. I ended up using ten sleeves of ornaments.
Step two: decide on your wreath size and create a circle from the foam.
Step three: start glueing! I found the best way was to put the glue on the ornament and then press the ornament onto the foam. That way you don't melt the foam as much as putting the glue directly on the foam would. You will have a little bit of melting, but this will keep it from being too bad. There wasn't much rhyme or reason to how I glued them on, and I did it in a couple layers so some of the ornaments are glued on top of other ornaments without touching the foam.
Step four: don't be worried if you have to adjust the size, to make sure my wreath stayed as round as possible. I had to cut about a 1/2 inch of foam, that's why my duct tape has masking tape over it, I misplaced the duct tape.
Step five: hang the wreath and stand back to admire your work! You can put some wire through the foam, but I was able to hang it on my hanger without any extra wire.
Good luck, it's not for the faint of heart and it took me about 4 hours to complete, but I got tons of compliments when I put it on my office door. Everyone was very impressed when I admitted I made it myself.
Subscribe to:
Posts (Atom)